Showing posts with label desserts. Show all posts

Thursday, September 30, 2010

Chocolate Turtles

I love how shiny the chocolate is!
(I set it on top of my organizer, so ignore the sorry background!)

Here is another recipe from Stephanie Tourles’ book, Raw Energy. This is a reworking of a classic chocolate treat, turtles, which combines chocolate, caramel and nuts. People have reworked turtles, but never like this! I have successfully enjoyed this treat and didn’t feel guilty one bit. Now that’s what I’m talking about! Have a sweet treat, don’t deprive yourself, and don’t feel bad about it either!


To demonstrate how much better this recipe is in terms of ingredients, I thought I’d compare it to a recipe for regular chocolate turtles. I went to http://www.cooks.com/ because it had an actual recipe for chocolate turtles. Other places had recipes for chocolate turtle pie, cheesecake, brownies. Not exactly what I was looking for. (Did I mention people had reworked the turtle recipe? Wow!) Anyway, I found a recipe that seemed simple and was the classic chocolate turtle treat with nuts, caramel and chocolate. You can click here to go to the recipe I found, but the ingredient list includes caramels, evaporated milk, pecans, butter, chocolate chips and vegetable oil.

The caramels are cooked butter and sugar, the evaporated milk is processed, cooked and canned, the pecans are, well, pecans, the butter is probably pasteurized, and the chocolate chips are full of sugar and processed chocolate. And, most likely the vegetable oil is probably soy, which I choose to avoid. (To find out why, see this post.)

Now, compare all those processed, sugary ingredients with the ingredients for Ms. Tourles’ turtles: raw almond butter, raw cocoa (cacao) powder, raw agave nectar, raw pecan halves. Four ingredients with no butter and no extra sugar. Granted, there’s no caramel substitute. But, believe me, once you try it, you won’t care that there’s no caramel. If you like chocolate and nuts, you’ll love this version. And, it is so easy!

Basically, the recipe is equal parts almond butter and cocoa powder, with half the amount of agave nectar. For example, if you use ½ cup almond butter, you’ll use ½ cup cocoa powder and ¼ cup agave nectar. Put these three ingredients in a bowl and slowly stir together. You have to go slow because the cocoa powder is so loose and light. Eventually, you’ll see it mixing and becoming a dark chocolate mass. Once it is all incorporated, pinch off small pieces and roll them into balls, placing the balls on wax paper. Gently press your chosen nut, whether that is classic pecans or what-I-have-on-hand almonds, onto the top of each ball. Cover and chill in the fridge for at least 4 hours.

Ms. Tourles recommends an 8-inch pan, but I just lined a large rectangular tupperware with wax paper. This was very convenient for covering, chilling and storing. Ms. Tourles also says she likes to store them in the freezer (for up to 3 months), where they “become quite firm but still chewy”. Mine were a little too hard when coming out of the freezer, so I prefer to keep them in the fridge, where they can be stored in a tightly sealed container for up to 3 weeks.

So, I’ve included a picture of my almond-topped turtles. I love how easy this recipe is, and they really are delicious. The almond butter gives you good fats, and if you make it yourself, you know there are no preservatives or additives. The agave nectar is a wonderful sweetener that won’t give you a sugar rush or crash later. And, of course, the almonds are full of fiber, good fats, protein and all kinds of good stuff. The cacao powder – well, that’s up for some debate. I suppose chocolate is still chocolate. But, I for one am happy to have a yummy alternative to a chocolate treat loaded with sugar and butter.

Tuesday, September 28, 2010

Cashew Oat Squares

Based on the "Cashew Maple Oatmeal Squares" recipe from Raw Energy: 124 Raw Food Recipes for Energy Bars, Smoothies, and Other Snacks to Supercharge Your Body by Stephanie Tourles

I decided to try this recipe because my hubby loves cookie dough, and in the recipe description, Ms. Tourles says, "These sticky and chewy treats will remind you of chilled oatmeal cookie dough." Oh, and the recipe does not require a dehydrator, which I still do not have, but am seriously considering.

These squares were delicious. It was hard to stop – we could have finished off the first batch entirely before dinner. I did alter her recipe, mostly because I had to substitute ingredients for what is available and cost effective for me. What follows is her recipe from the book, with my alterations in parentheses.

Cashew Maple Oatmeal Squares, by Stephanie Tourles

10 Medjool dates, pitted and chopped, about 1 cup (I used Deglet dates)
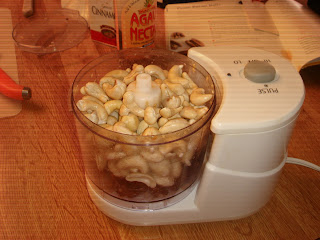
1 cup raw cashews (I germinated the cashews although she doesn’t say to do so)
½ cup raw oats
¼ cup maple syrup (I used agave syrup)
¼ teaspoon ground cinnamon
pinch of sea salt
coconut oil, raw and unrefined, for greasing pan (I just used wax paper instead)

1. Put the dates, cashews, oats, syrup, cinnamon and salt in a food processor. Blend until a cohesive, sticky cookie dough forms, about 30 seconds. It will look and taste similar to oatmeal cookie dough.


2. Coat the bottom of an 8-inch square pan with coconut oil or line with waxed paper. Spread the mixture in the pan to an approximate thickness of ½ inch. If your fingers get too sticky, dampen them to help pat the dough into the pan.

3. Cover and freeze for 4 hours, until the dough is relatively firm. Remove from the freezer and cut into 1-½ inch squares.

4. Store the squares in a tightly sealed container in the freezer for up to 2 months. They will have a nice, stiff “chew” when eaten directly from the freezer, so don’t worry about breaking your teeth. If allowed to thaw, they will become too soft and sticky.

Yield: About 24 squares

I will definitely be making these again and again. They were a delicious snack or dessert, and are full of good stuff. No flour or white sugar and no empty calories to give you a false energy rush then crash. And they were so easy to prepare! It’s almost sinful how easy they are and how delicious! Enjoy!

Friday, April 23, 2010

Pound cake with strawberries


It must be strawberry season because they are on sale at the grocery store, and they actually look good! When I see strawberries, I immediately think of strawberry shortcake. I had everything on hand, including a recipe, for pound cake, not short cake, so pound cake is what I made. And, boy was it delicious!

The pound cake is thick and dense, yet subtle in the flavor. It gets a little extra something with the addition of a little nutmeg. And the strawberries are perfect - sweet and a little tart and very juicy. YUM!

The plate on the left is for my hubby, who chose to top his with a drizzle of agave nectar. The plate on the right is for me, and I chose to drizzle chocolate hazelnut spread on mine. Fabulous!!

I used the pound cake recipe from the Better Homes and Gardens cook book, which follows. I looked on their website, and the recipe for Pound Cake and for Classic Pound Cake, is not the recipe for Pound Cake in the book I have, which is from 1989 of course.

1 cup butter
4 eggs
2 cups all-purpose flour
1 teaspoon baking powder
1/4 teaspoon ground nutmeg (optional)
1 cup sugar
1 teaspoon vanilla

Bring butter and eggs to room temperature. In one mixing bowl stir together flour, baking powder, and, if desired, nutmeg. In another bowl beat butter with an electric mixer on medium speed for 30 seconds.

Gradually add sugar to butter, 2 tablespoons at a time, beating on medium to high speed about 6 minutes total or till very light and fluffy. Add vanilla. Add eggs, one at a time, beating 1 minute after each addition, scraping bowl often. Gradually add flour mixture to butter mixture, beating on low to medium speed just till combined.

Pour batter into a greased and floured 9x5x3 inch loaf pan. Bake in a 325 degree oven for 55 to 65 minutes or till a toothpick inserted near the center comes out clean. Cool on a wire rack for 10 minutes. Remove cake from pan. Cool thoroughly on a wire rack. Makes 12 servings.

This recipe was easy to throw together, took no time at all and turned out wonderful. The longest part was waiting for the butter and eggs to get to room temp! Enjoy!

Thursday, February 18, 2010

Lemon Meringue Pie #2


Hey, it looks like a pie! Yeah!

I am putting this one in the Success column for me for sure! It was not perfect (note the droplets on the top and the cracked crust) but it was leaps and bounds better than my first one. We could actually eat it with a fork, haha.

So, fellow foodies and far-more-experienced-bakers, help me out with this one, pretty please. Why do I get the droplets on the meringue? I used a stainless steel bowl this time which I thought would be an improvement over the plastic one I used last time. But, I still got the dreaded droplets. Any suggestions and recommendations would be appreciated.

My second problem with this pie was a lot of liquid. After we enjoyed the first slices, I stored it in the fridge. The next day I pulled it out to have some for dessert and there was a lot of liquid in my pie plate. Is that the water from the filling? Why would it do that? My aunt suggested I did not boil it long enough the second time. Would you agree?

Well, here is the recipe, altered from the Better Homes and Gardens recipe.

Lemon Meringue Pie Filling
1 1/2 cups sugar
1/3 cup cornstarch
3 eggs
2 tablespoons margarine or butter
1 to 2 teaspoons finely shredded lemon peel
1/3 cup lemon juice

Baked Pastry Shell (I used a store-bought pie shell - I'm not that advanced yet)

Meringue for Pie
3 egg whites
1/2 teaspoon vanilla
1/4 teaspoon cream of tartar
6 tablespoons sugar

Bake your pastry shell/pie crust per the instructions.

Preheat the oven to 350 degrees.

For the filling: combine the 1 1/2 cups sugar and 1/3 cup cornstarch in a medium saucepan. Slowly stir in 1 1/2 cups water, while heating over a medium-high heat. Cook and stir until thickened and bubbly. Reduce the heat and cook and continue to stir for 2 minutes. Remove from the heat.

Separate the egg yolks and whites, setting the whites aside for the meringue. Beat the egg yolks slightly to combine them, then, gradually stir 1 cup of the hot filling mix into the egg yolks (called tempering, right?). Then, return everything back to the saucepan and bring it to a gentle boil. Once it is gently boiling, cook and continue to stir for 2 minutes. Remove it from the heat and add the margarine or butter and lemon peel. Stir to combine. Add lemon juice gradually, stirring to mix well. Pour the hot filling into the baked pastry shell/pie crust and top with the meringue, sealing the meringue to the edge of the crust. Bake for 15 minutes then cool on a wire rack.

For the meringue: Bring egg whites to room temperature. Beat the egg whites, vanilla and cream of tartar with an electric mixer on medium speed until soft peaks form (when the tips curl). Add the sugar one tablespoon at a time, until the sugar dissolves, and the mixture is glossy and forms stiff peaks (tips don't curl). Immediately spread the meringue over pie, sealing to the edge of the pie crust, and bake as directed in the filling portion.

Again, any advice, suggestions, recommendations would be fabulous! This is my father's and my husband's favorite pie, and I'd really like to know how to make it well. Thanks so much!!

Lemon Meringue Pie on FoodistaLemon Meringue Pie

Wednesday, December 23, 2009

Lemon Meringue Pie #1

Looks can be deceiving.


While it may look pretty, this first attempt at Lemon Meringue Pie (LMP) ended up not really pie. The filling was runny. It wasn't even thick like pudding or eggnog - not even close.

But, we ate it anyway! And, it tasted great!

LMP is not difficult as far as the steps and ingredients go, although I did think it was a great recipe for two people to work together. My mom and I made this while she was here over Thanksgiving and it worked out great as far as timing and helping each other. While my mom was working the filling on the stove, I was working the meringue on the counter. We were ready to come together at the same time, just like the recipe says. I do not know how my grandmother-in-law made these pies all by herself. She must have had secrets! (Love you, Grandma Suzie!)

Our pie was not a success in the traditional sense of pie, in that you cut a piece of pie, put it on a plate, and eat it with a fork. The crust (store-bought) was good and the meringue was light and fluffy and sweet, although it did have the sugar droplets on top after we put it in the fridge overnight. (Why does THAT happen?) The filling was very lemony and tart, but not too tart. The only problem was the filling just never set. But, it was easy to eat with a spoon! And, that, ladies and gentlemen, is exactly what we did.

With all my vast experience in baking (tongue is firmly in cheek), I am going to hypothesize that we did not have enough cornstarch to thicken the filling. I looked at a ton of LMP recipes online trying to figure out what went wrong, and most of them called for 1/3 cup or more of cornstarch, and no flour. Our recipe called for 3 tablespoons of cornstarch and flour each. Since we all liked the flavor of the filling, I am going to keep the recipe the same, except for the cornstarch - I'll up that to 1/3 cup, and I will omit the flour. We'll see how it turns out then.

My mom-in-law and I are going to try LMP while she is here for Christmas. We have enough lemons from our lemon tree, we could try it at least a dozen times. Eventually, we'll get it right. And I am sure we will enjoy every single attempt, solid or not!

Merry Christmas, Happy Holidays, Seasons Greetings, etc. Enjoy your time with family and friends!

Tuesday, December 1, 2009

Thanksgiving Day success!

My mother (a.k.a. Nana) and I cooked up a storm! Nana arrived on the Tuesday before Thanksgiving, in the afternoon. We discussed the Thanksgiving feast, sides and desserts, and put a shopping list together for her special recipe items that we had not bought the day before. The shopping list was very short.

The next day, Wednesday, we started cooking! We made cornbread for the dressing (I guess it’s not called stuffing, because technically, it did not get stuffed into the bird). Then, my mom made the dressing. We also baked biscotti and lemon bars, and made potato salad. My mom’s potato salad is always best the day after it is made. The flavors really meld together! So, she always makes it the day before.

(Note that the cornbread and lemon bars were made using the Better Homes and Gardens New Cookbook, Tenth Edition, recipes. Aren't those cookbooks all handed down? Mine was! I most certainly wasn't cooking in 1989! I could not find a link to those recipes specifically, but have included links to the Better Homes and Gardens website for the most similar recipes. The New Cookbook is on its Twelfth Edition.)

The day of Thanksgiving, we made the pumpkin pie, green bean casserole, yams, cranberry sauce, and gravy and roasted the turkey. We also had steamed white rice on the side, and of course, finadene! (Finadene is a sauce Chamorros use to spice things up! It is made with soy sauce, vinegar or lemon juice, onions and boonie peppers - hot peppers that grow wild in Guam. The jungle in Guam is referred to as the "boonies".)

We ate early, around 1pm, and everyone enjoyed everything. We had a special guest - our daughter’s friend from college who did not go home to Texas for the holiday. He had seconds, so I know he thought it was yummy. Although any home cooking probably would have been good after months of dorm cafeteria food!

After the dinner was served, everyone had pumpkin pie and vanilla bean ice cream for dessert. Then, the old folks went and laid down for a nap before heading out to see “Ninja Assassins”. (I know - nice movie for the family to see. What can I say? We like action!) I told my husband as we laid down for our nap (because like it or not, we are now the “old folks”), “Cooking takes a lot out of you!” No wonder the older people always slept after eating, and the kids continued to play. The kids didn’t cook for two days! He also reminded me that the kids slept in until noon!

Nana’s new recipes (the sausage cornbread dressing, the biscotti and the orange-cranberry sauce) were all big hits. I don't have her recipes for these. I'll see if she'll let me post them. The old favorites were still delicious, too. Sorry there are no pictures of our feast and new recipes. I have to get used to stopping to take pictures! And, now, my parents are gone, and so are our college student daughter and her hungry friend. It’s back to just the hubby and me, and we have lots of leftovers!

LinkWithin

Related Posts with Thumbnails